Watermarking your photos is a step that shouldn’t be overlooked.
No matter if you’re a photographer trying to generate income from your photography business, a graphic design artist, a blogger or a realtor, inserting a copyright text or your logo into your original pictures can make a difference.
Reasons to Use a Watermark
First of all, adding a watermark to your images is an effective technique to discourage theft. Once you place a visible text or logo onto your photos, you make it clear that the photos represent your intellectual property. Anyone who will use the images without your prior consent will commit copyright infringement.
Watermarking can be used to protect your pictures, but it can also help you reach new audiences and expand your visibility. Just imagine if one of your photographs goes viral. This means that other people/pages will share your content with their audiences. In this case you’ll most surely want to have an identifiable mark on your image that will direct users to your social media profile, your website or blog.
How to Watermark Multiple Images
If you’re ready to protect/promote your original photography, you should know you can accomplish this task with diverse software. You can resort to a tool particularly built for watermarking such as PhotoMarks, but you can also do it with an all-round editor like Adobe Photoshop.
In this Photoshop tutorial we’ll show you how to watermark an entire folder of photos at once. This way you can save a considerable amount of time and energy and implicitly improve your productivity.
Step 1 – Open the Photo
The first thing you have to do is open one of the images in the selected folder. In order to do this go to File > Open and select the desired image.
Step 2 – Record a New Action
For our next step we have to use the Actionspanel provided by Photoshop. Basically we are going to tell the software to record all the actions we carry out from now on and to reproduce them later on.
These are the steps you need to follow: go to Window > Actions, click the “Create new Action” button, give it a proper name, in our particular case “Watermark”, and hit “Record”.

Step 3 – Create your Watermark
This is the step where you choose which type of watermark you want to use and where to place it. If you’re using a copyright notice, it’s advisable to position it in the lower right corner. This way it will be less obtrusive and it will not cause any distractions from the image itself.
Select the Horizontal Type Tool and begin typing the name of your watermark. It can be your name, the name of your website or anything else you wish. Then change its appearance to your liking by playing around with the font, size, color or level of opacity.
Step 4 – Customize your Text Watermark
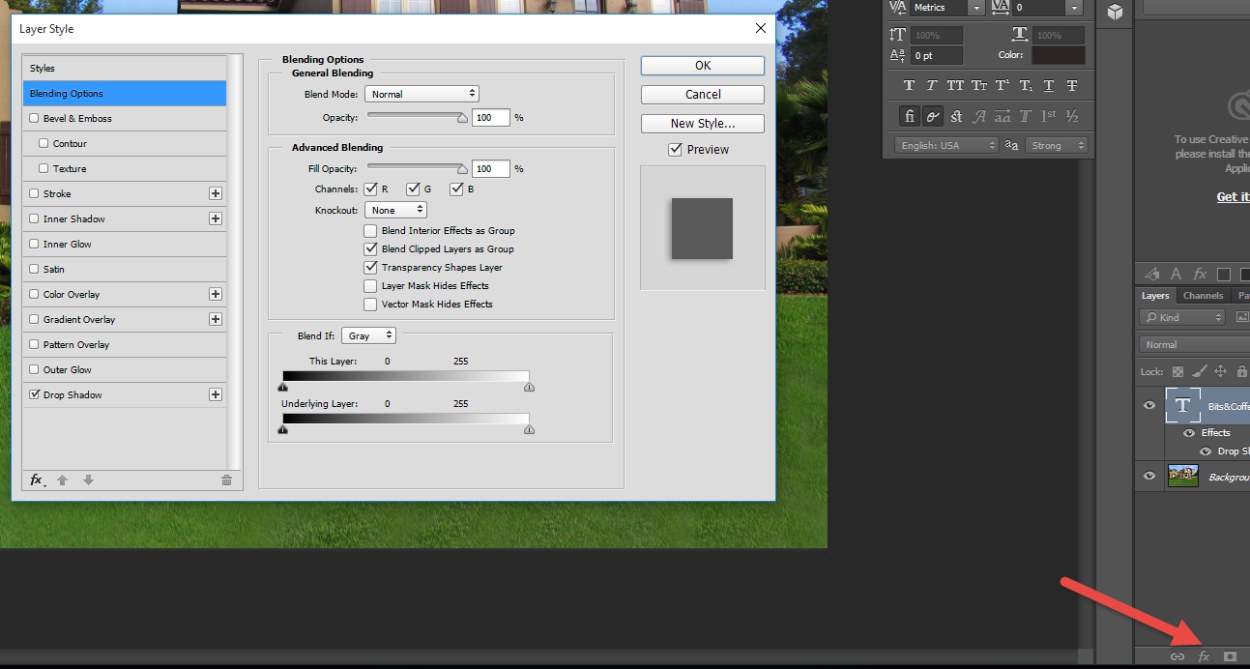
If you want to make your watermark stand out, Photoshop gives you the possibility to apply certain effects. For that you need to click on “fx” on the lower right panel and then Blending Options. Here you can play around with Bevel & Embossto add highlights and shadows, add a stroke, inner/outer glow and many more. Of course, this step is completely optional and depends on each user’s individual preferences.

Step 5 – Position your Watermark
This following step is very important, because it will make sure the watermark you apply on the initial image will maintain its position on all processed photos from your selected folder. Here’s what you have to do: in the Layers tab on the bottom right of your screen select both the image and text layer by hitting Ctrl+Click.
Now take a look at the main toolbar and you’ll see that the Arrange buttons are now clickable. Click the “Align right edges” button and then the “Align bottom edges” one. As an alternative, you can go to Layer > Align > Right Edges, then Layer > Align > Bottom Edges. Regardless of the method you choose, it will position the watermark in the the lower right-hand edge.
In case you feel it got too stuck to the edge, you can opt for a little padding. In order to do that, select only the Text layer and then, using your arrow keys, move it to the left or up until you find a position that suits your taste.

Step 6 – Stop Recording
Once you’re done, go again to the Actionspanel and hit the square button that says “Stop Recording”. At this point you can close the initial photo, as you would be needing it anymore.
Step 7 – Begin Batch Processing
Now all there’s left to do is automate this process for the entire folder.
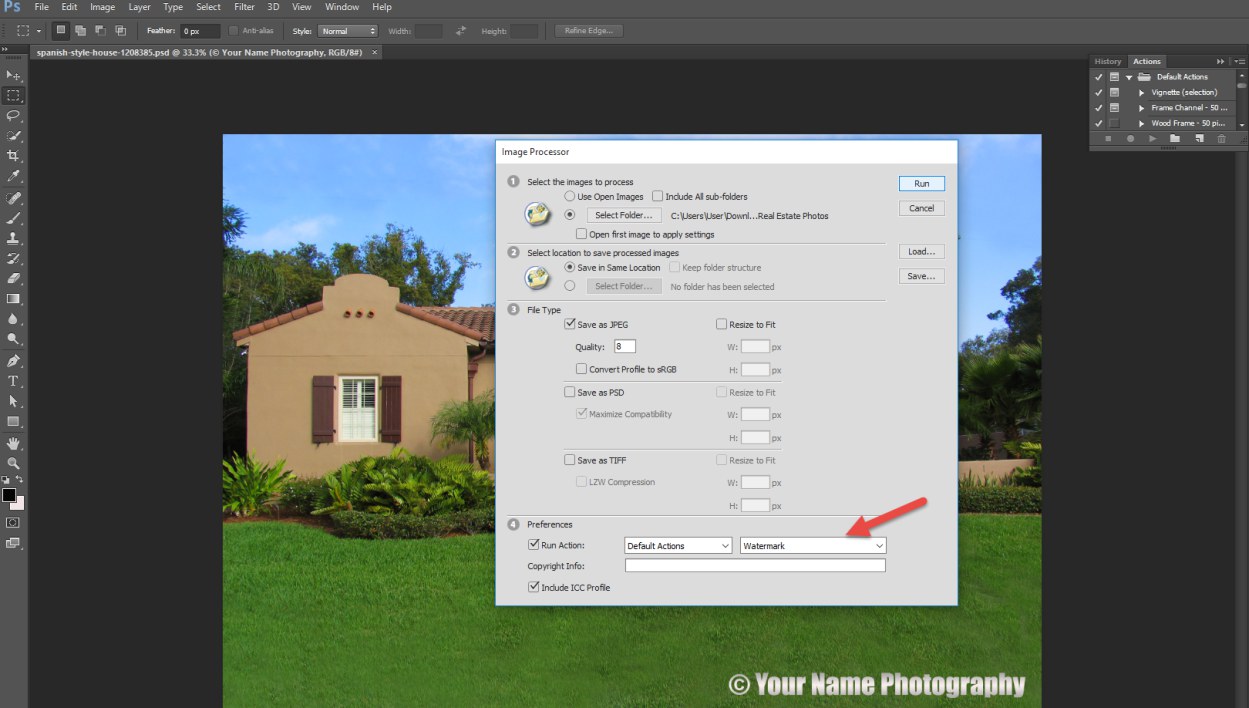
Go to File > Scripts > Image Processors. Select the Folder you want to process, as well as the folder where to save the processed images. Choose the preferred file type and also the picture quality. Make sure that in the Preferences section “Run action” is ticked, select the action you want to perform (we named it Watermark at the beginning) and hit Run.

And that’s it. Once Photoshop has finished, you can go to the destination folder where you saved your photos and find them all watermarked.